Tag: vpn

  • VPN Between OPNsense and Sonicwall

    VPN Between OPNsense and Sonicwall

    The scenario is two networks on the OPNsense side, one on the Sonicwall’s. Changing the defaults for a little bit of security. Both sides also have static IPs but this setup also worked when the OPNsense’s was dynamic.

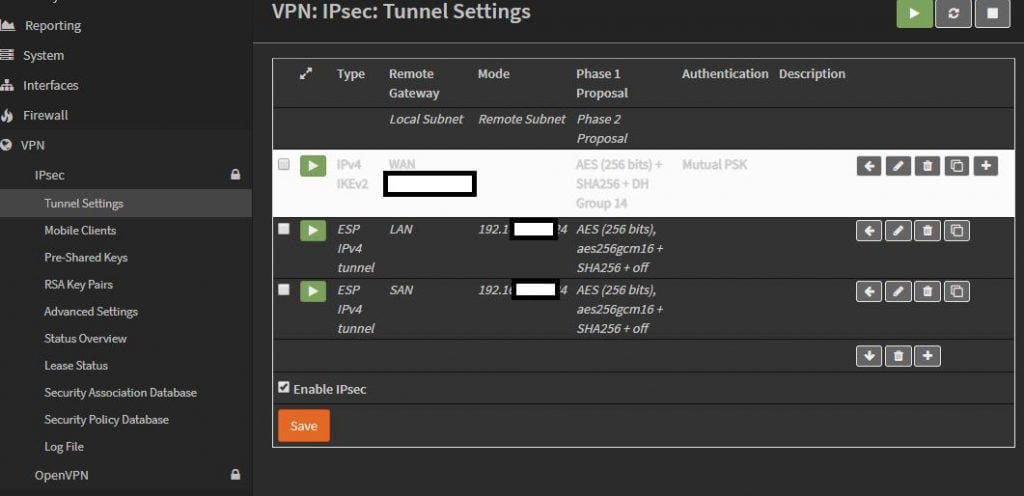
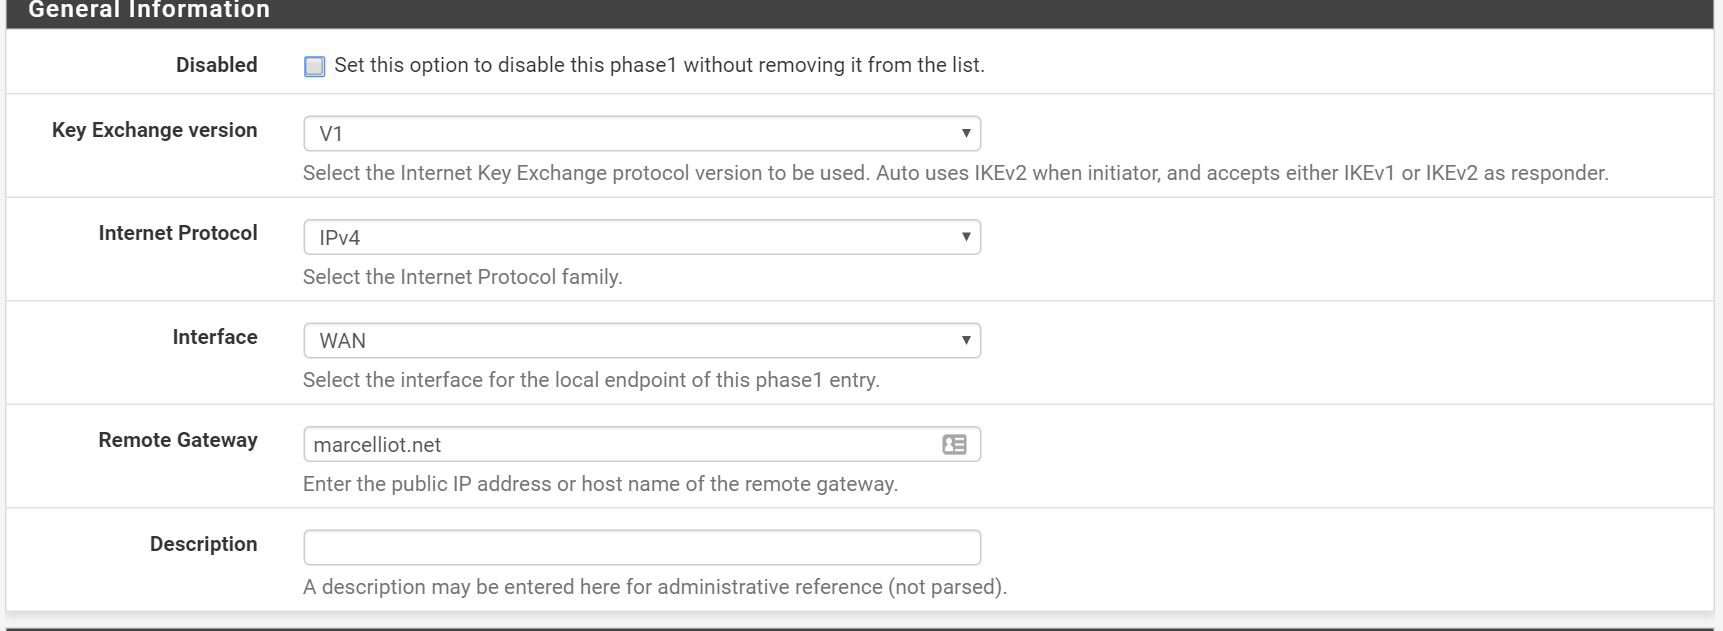
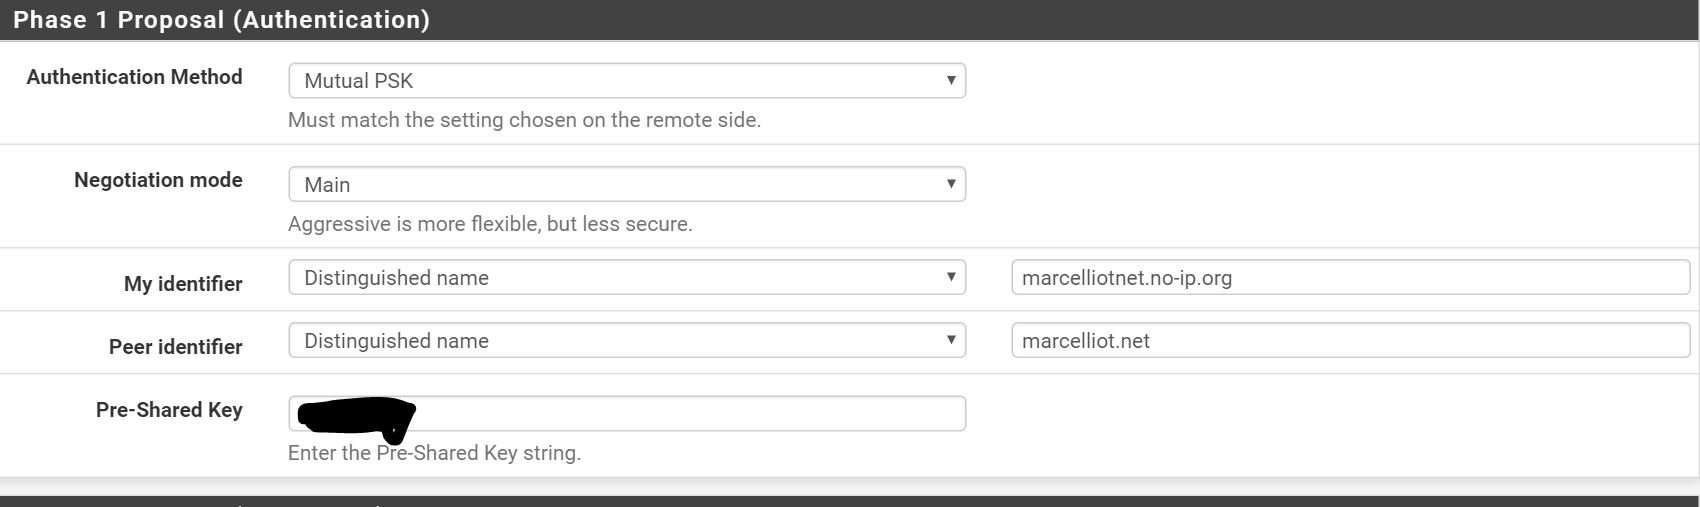
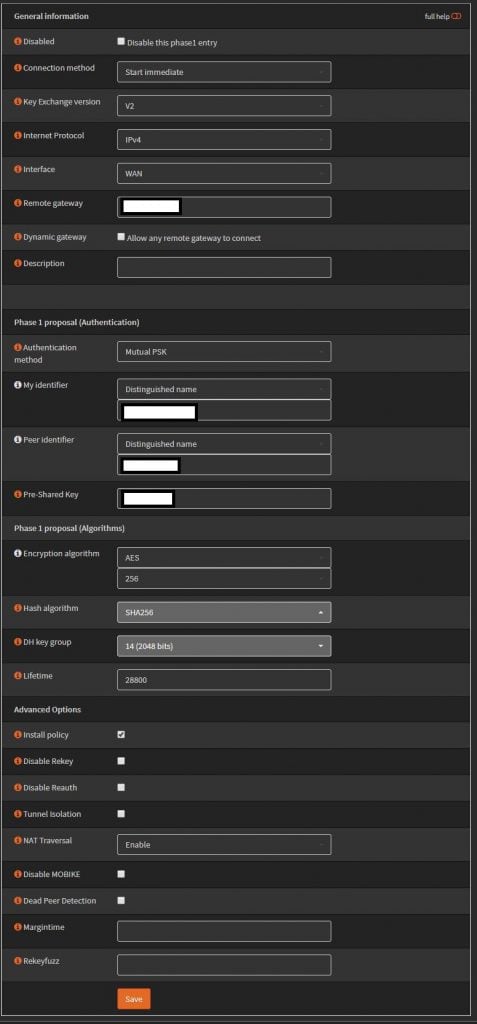
    Using IKEv2 with preshared key. AES256, SHA256, and DH Group 14. For the identifiers use distinguished name, and enter in your domain names, these actually don’t have to resolve so you can make them up. Set life time to 28800.

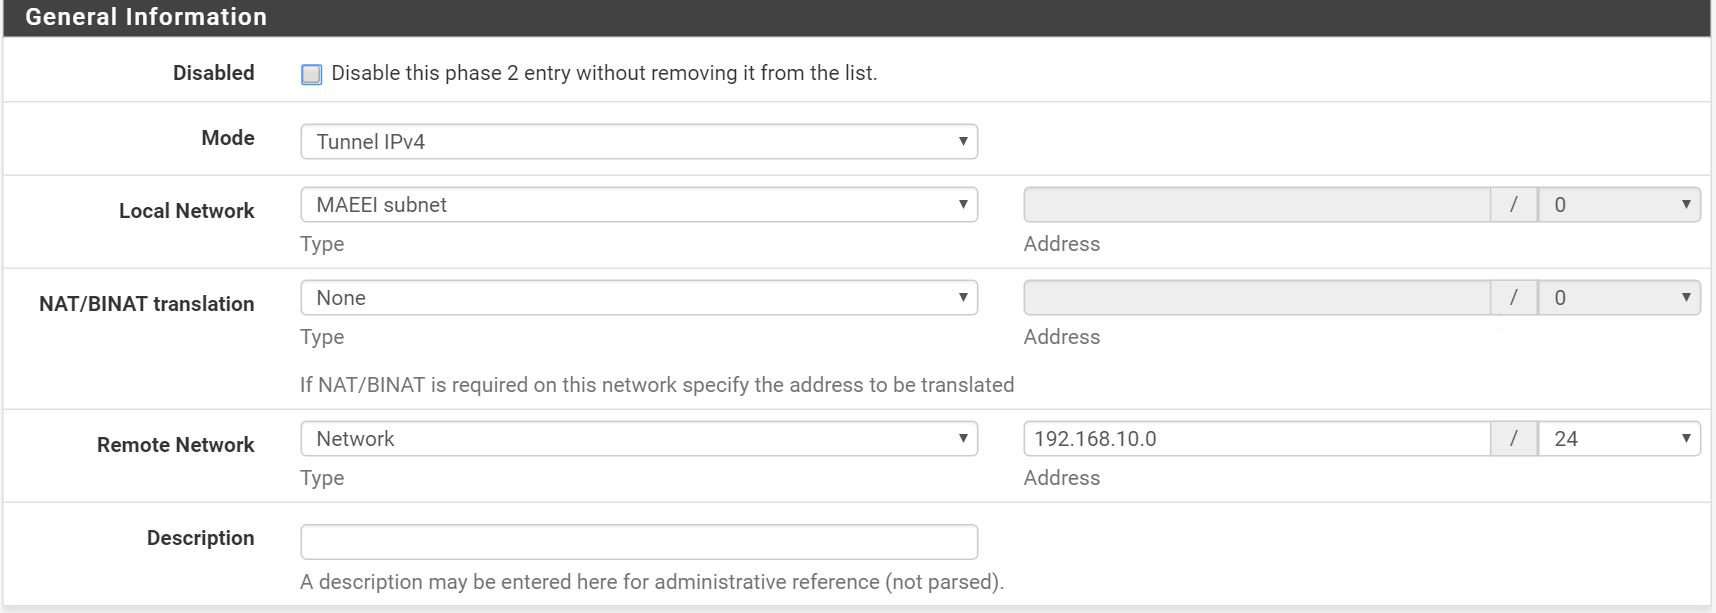
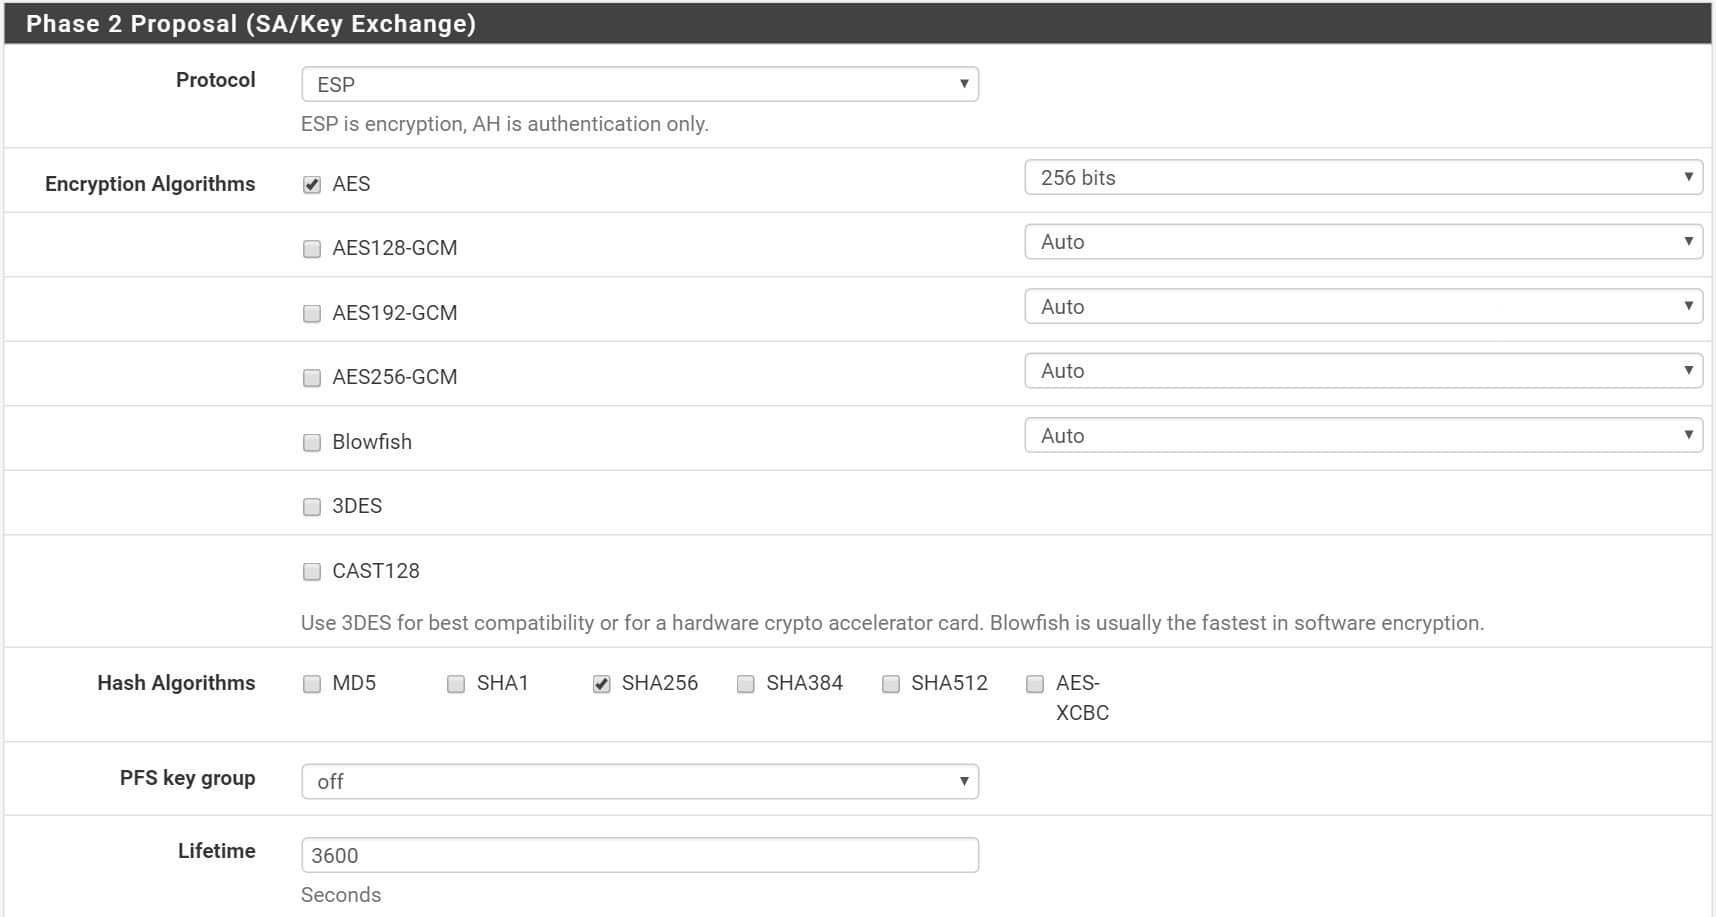
    Phase 2. The remote network is going to be the Sonicwall’s “LAN” 192.168.x.0. Change the lifetime to 3600, uncheck unused ciphers. I have two networks on this side, so I just created another phase 2 policy for the 2nd network.

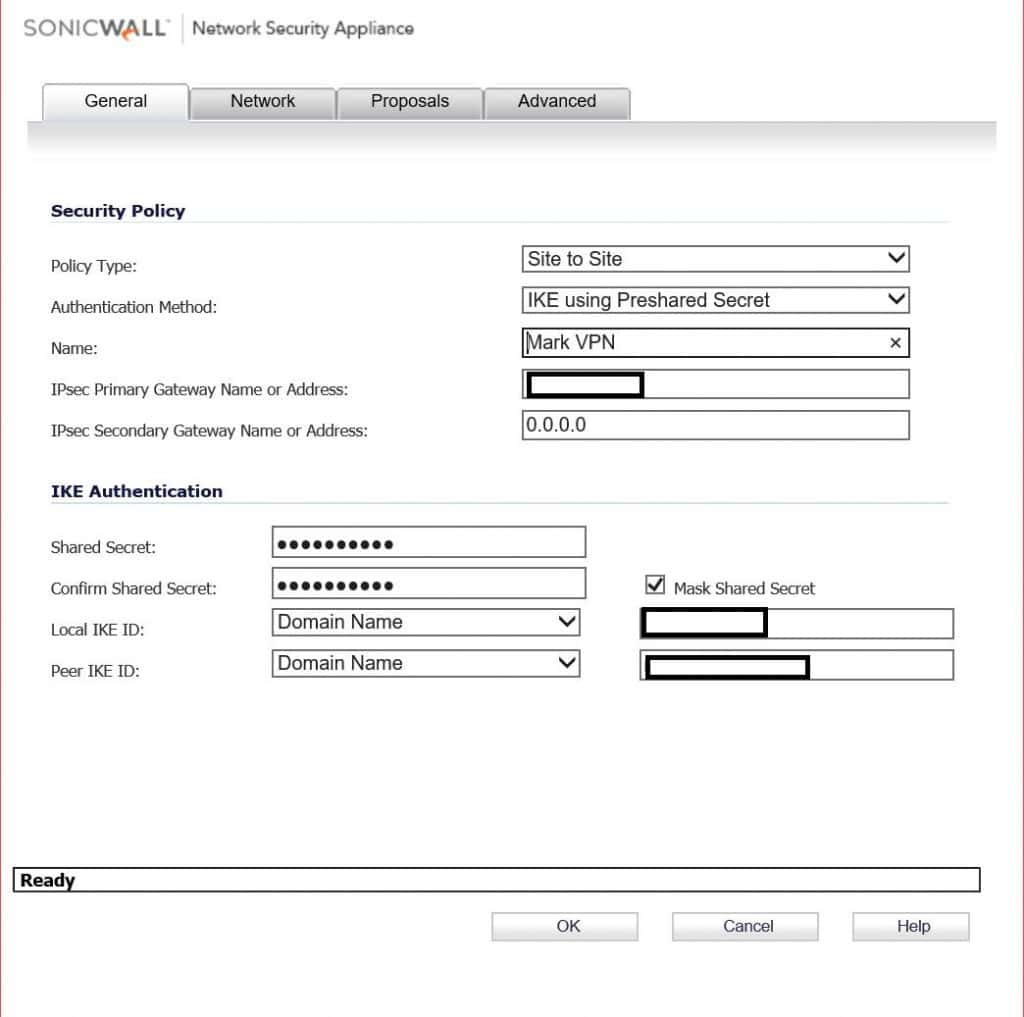
    On the Sonicwall, enter in the OPNsense’s public IP, and the preshared key. For IKE IDs, these will be the My and Peer identifiers from phase 1 of the OPNsense config.

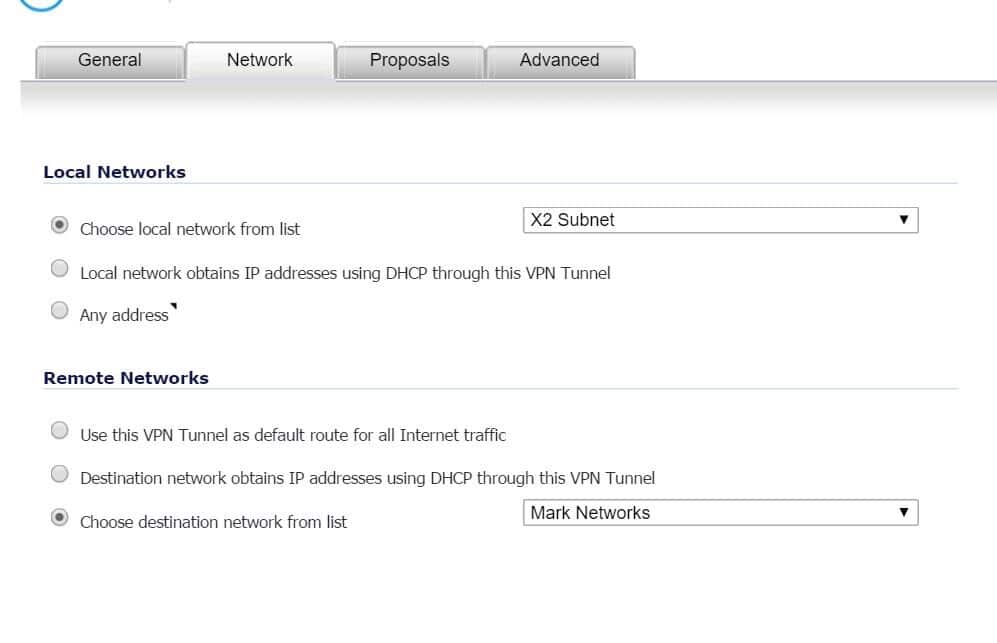
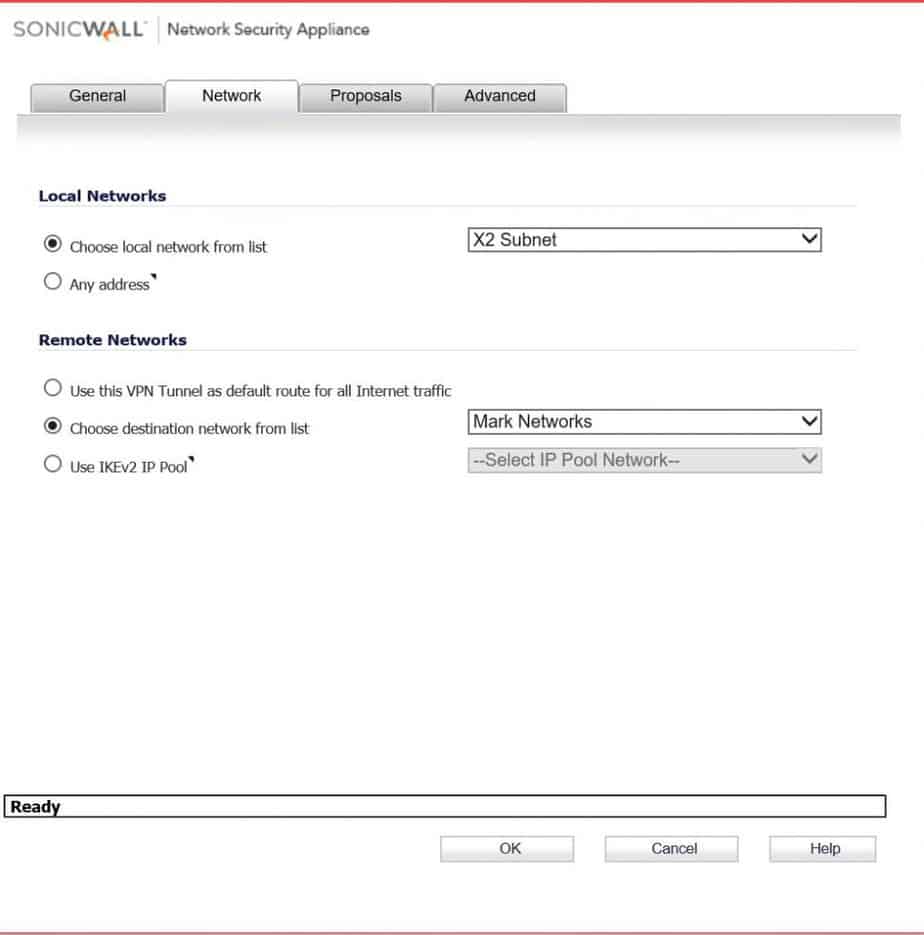
    Pick the local network on the sonicwall side. For remote network pick the address object you should have created for this. ( Sorry, I don’t go over creating one of those). In this scenario there are two networks on the OPNsense side, so I create two VPN Network address objects, and put them in a group.

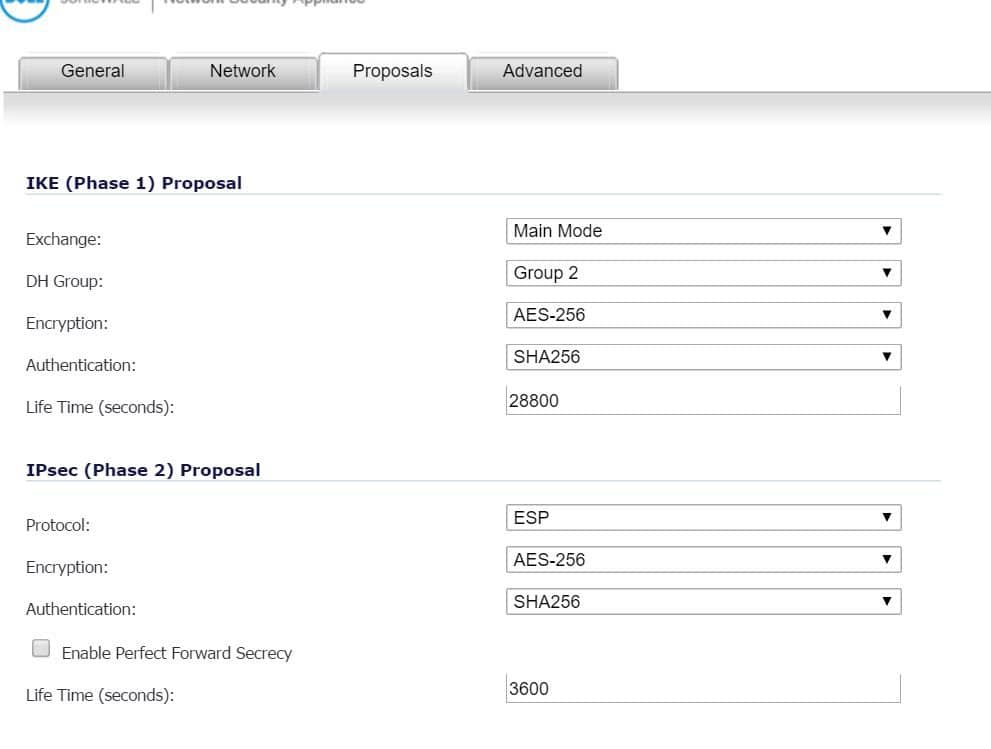
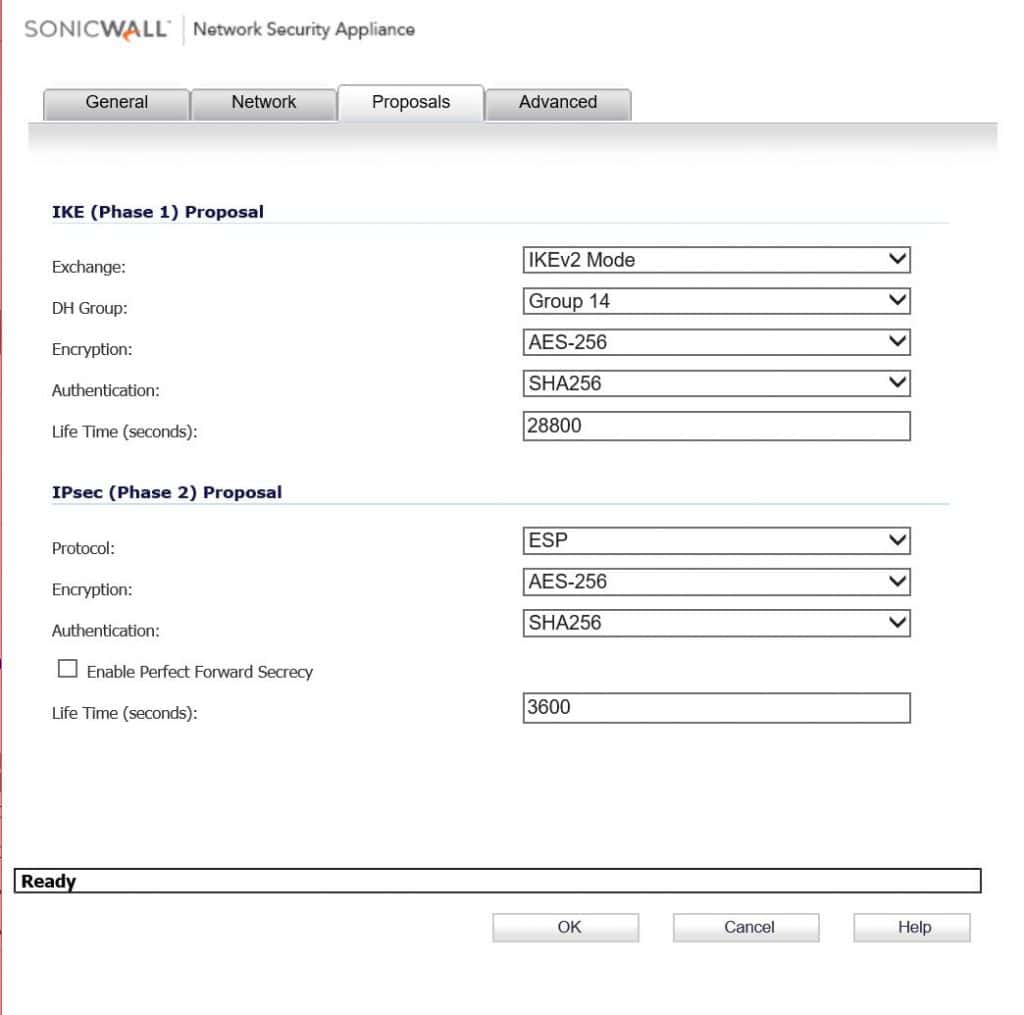
    Here again using IKEv2 AES256, SHA256, and DH Group 14. Change Phase 2 life time to 3600.

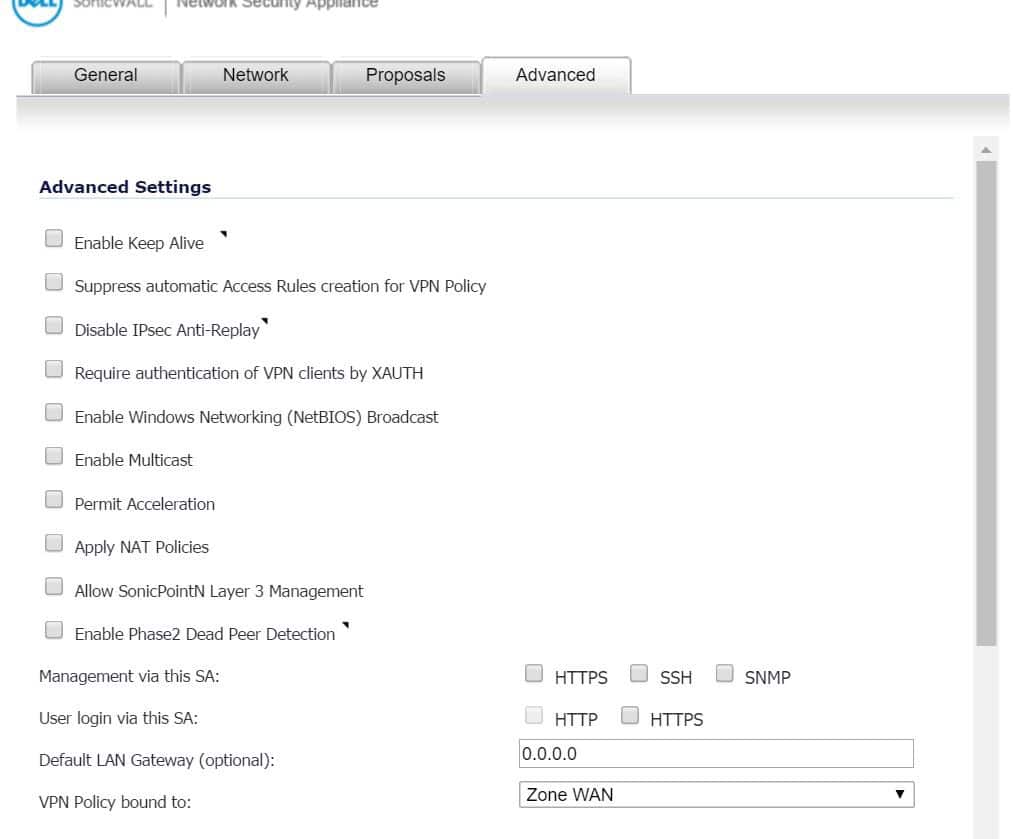
    Enable keep alive and do not send trigger packet. Click OK and if everything goes well you should see some green lights. This also doesn’t go over what firewall rules you would need to create to pass traffic, you could do any any allow all, but you might no trust the other side.

  • SonicWall PFSense VPN

    Setting up a tunnel between two different firewalls can be rather tricky at times. Here we’ll go over configuring a VPN with a SonicWall NSA 250 on 5.9.1.1-39 with a PFSense on 2.3.1-RELEASE-p5.

    Let’s go over the config on the sonicwall first. On it, I only need to get to the DMZ network on the X2 interface. There are two networks on the PFSense side, so need to create two address objects and place them in a group.
    addressobjects

    Now with the address objects created, we can start on the VPN configuration. The Sonicwall has a static IP, the PFSense does not. It easier to get the tunnel up if we use domain names for the IKE IDs. I created a dynamic DNS name with NO-IP.org to use on the PFSense side.
    general

    For the network config I select the network on the Sonicwall side for the local network which is the X2 subnet, and for the remote networks, I select the address object group.
    network

    IKE proposals and lifetimes for the phase1 and phase2 policies on both sides need to match.
    Proposals

    On the advance tab just leave at default.
    advanced

    Now on the PFSense side you create a phase1 policy then phase2 policies for the 2 local networks.
    PFtunnels

    generalPF

    Phase1PF

    Phase1PF2

    advancedPF

    Next, create a phase2 policy.
    Phase2PF

    Phase2PF2

    I enter in a host on the sonicwall side for the PFsense to ping to keep the tunnel up.
    Phase2PF3

    Now with any luck you should have green dots.
    greendots

  • Cisco ASA 5505 to SonicWALL NSA 240 VPN

    Cisco ASA 5505 to SonicWALL NSA 240 VPN

    This article is going to assume that you know a little bit about VPNs and both devices. I know more about the Sonicwalls than i do the Ciscos so I pretty much just run the VPN wizard on the Cisco and change the default settings on the Sonicwall to get the tunnel up.

    We’ll configure the Sonicwall first. Here give the tunnel a name, put in the DNS name or IP address of the other side, make up a PSK, and where it says Peer IKE ID put in the Cisco’s LAN IP address.


    I have the Cisco behind another Sonicwall so the exchange to set to aggressive, on the Cisco I think the Wizard sets the Exchange to aggressive mode by default, so one less change I had to make on the Cisco. Phase1 is changed to AES-128, SHA1 and a lifetime 86400sec (8 hours). Phase2 is ESP, AES-128, SHA1, and lifetime changed to 86400. I’m sure the tunnel would still come up if you kept the encryption at 3DES, but AES-128 is stronger, and I heard it has less overhead.


    I skip the network tab, I’m not going over how to create address objects/groups, but all you do is put in the local and remote LAN networks. On the advanced tab I cleared out keep alive because other firewall is behind another firewall that is NATting so it will have to bring up the tunnel.


    Um ya here is a shot of the main page of the 5505, yaaa..I ran the wizard. :b


    Here I just change the remote to a group of the two DMZs on the other side.


    Here I enabled NAT traversal, cause once again the Cisco is behind a other firewall that is NATting. Also here is where you would change the IKE negotiation mode (called Exchange on the Sonicwall) to main.


    Ping across the tunnel from the Cisco side and with any luck you will have a fully operational IPsec PSK VPN tunnel. 🙂

    Update: I found this video when seeing how my page was ranking in search engines which is doing very poor, ha but I thought the video might help.

    [youtube]http://www.youtube.com/watch?v=ufjMfMSQxD8[/youtube]

  • Phone Factor – Two Factor Authentication

    Phone Factor – Two Factor Authentication

    If you want to be really secure now days you need more than just a password. you need another type of authentication. Blood is the best thing to use to authenticate yourself, DNA is like 1,000,000,000x unique. Wouldn’t it be great when your getting money out of the ATM a needle would come out to prick you and take your DNA, not really. Phone factor is a program that calls you on your phone (or text) makes you press # on your phone after you put in your password. So even if the hacktivists steal your username and password and post it on pastebin someone would still need your phone to get in to your playstation account or whatever.

    Here I will show you how to setup Phone Factor to call you after you sign in to your VPN. So basically you just install Phone Factor on a box in between the VPN device, In my case a SonicWALL SSL-VPN 200 and the server that authenticates you, in my case a windows 2003 box running IAS.

    Here on the VPN device just put in the IP address on the box you installed Phone Factor on. You will have to change the timeout to something higher to give Phone Factor enough time to call you and for you to answer back.


    On Phone factor you put in the IP address on the VPN, the shared secret, and the port the VPN uses (1812 for RADIUS).

    Then put in the RADIUS servers IP, shared secret, and what port it uses.

    on the users tab you will enter in the usernames and phone numbers. The free version of phone factor allows 10 users i think.

    In the radius server just put in the system’s IP that has phone factor installed on it as the new client and you should be good to go assuming you have the radius box configured correctly.

    After that you can log in, put in your username/password. you will get a call on your phone telling you to press #, then that’s it your in!

    Please do not email me if you having troubles, this is pretty straight forward and the only problem i ran into was the timeout part on the vpn appliance.