This blog has moved around a little bit. From being on a physical box, to a different physical box, then being P2Ved, and finally for now it’s on a 2012 R2 VM. For most of its life it has had Win 2k3 for its OS. When it came time to restoring .bkf files to Server 2008 and 2012 that i had made using NTbackup, it was nowhere to be found. I guess could have just copy and pasted the data over, but i like to make things harder for myself. Server 2008 and 2012 doesn’t have NTbackup. After some searching the Google I found the solution, it took some digging so I thought I would post it.
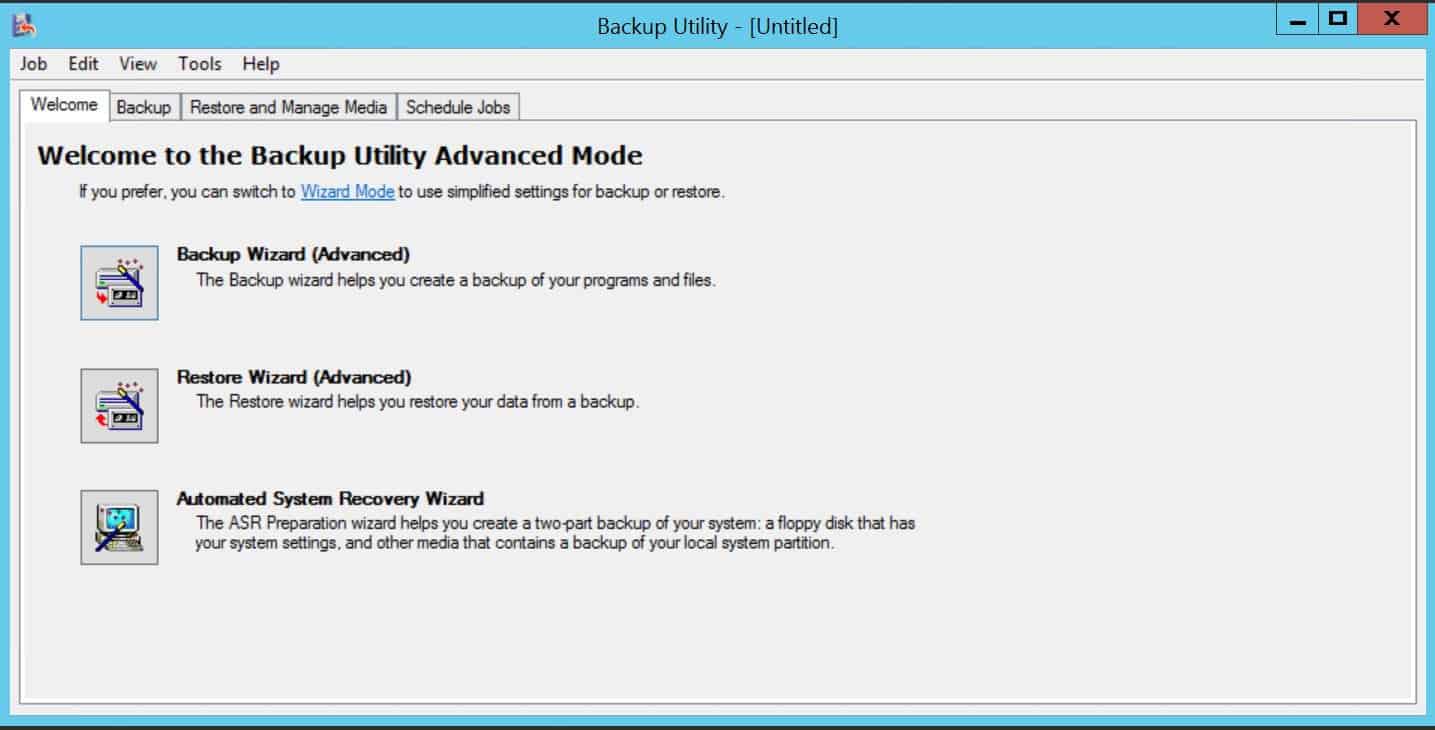
If you need to restore a .bkf file to a Windows 2008 or 2012 box and you still have the old 2003 box up. You can just copy the NTbackup files from the 2k3 box to run NTbackup on your new server.
you need to copy over 3 files from C:\Windows\System32:
ntbackup.exe ntmsapi.dll vssapi.dll
After you copy over the files, you can run NTbackup to restore that .bkf 🙂
I guess I was bored at work, but when I started at the place I work at now, they had Kayako Fusion installed on a WAMP box running XP sitting on a laptop at the desk I sit at. I built a Proxmox box the other day out of an Acer desktop and I thought “boy wouldn’t it be great if I could move Kayako off that stupid laptop and put it on a VM running Ubuntu?!” So I created a VM and installed Ubuntu, Apache, MySQL, PHP, and SSH. Installed MySQL workbench on my laptop and exported the Kayako database, then grabbed the Kayako web files.
I wanted to have this system running on the least possible memory it could so I uninstalled the GUI from Ubuntu which also forced myself to learn Linux commands better, lol. I used Putty and Filezilla to administer the box. The whole process went pretty well. The only problems I ran into were there were cache files in one of the web files directories that were moved over that need to be deleted. PHP needs to be installed with IMAP and with the mail function, and Setting up the cronjob that uses wget to run a PHP script that fetches the emails and places them in the queue.
Sipwise’s sip:providerCE v2.6 is a free VoIP solution that works…that’s about it, it doesn’t work great but it does work. It could have been my environment, but I don’t think the setup is anything special. First I installed sip:providerCE virtual image, on to my ESXi box. Log into the VMware console for the newly installed sipwise VM with the username/password of root/sipwise. I just let sipwise grab a DHCP lease, then run ‘ngcpcfg apply’ to generate the configuration files and reboot the server.
After that you should be able to log into the web interface at https://ipaddress:1433 with the username/password of administrator/administrator. You will then need to create a domain i.e. voip.yourdomain.com this can be an IP address as well. After that you will need to create a user, [email protected] and give that user a password. That’s pretty much it on the server side.
Now we need a client for Windows/OSX/Linux I used Jitsi, it’s kinda slow, but that’s what the guide I followed used so…but install the client and when it pops up to create an account click on Use online provisioning link at the bottom of the window. Check the Enable provisioning check box, select Manually specify a provisioning URI and put the following URL there, with only the IP address part changed to reflect your IP or domain name (make sure to leave the rest intact exactly as shown here):
Close Jitsi and reopen it, and it should ask you for a username/password, after you log in you will need to go to Tools, Options, In the Accounts tab select the SIP account it created for you and click the Edit button at the bottom. In the Presence tab un-check the Use SIP Credentials check box and manually enter your username and password or close and reopen the app.
The Android client I used was CSipSimple which was very easy to setup, just create a basic account, give it a name, put in your username/password and server address.
If your going to be connecting to this from the internet you need to port forward https and UDP 5060/5061 to the SIPwise server.
Links below are to download the VM image and the blog post I followed. SIPwise Blog VMware Image