Here is a tip to extend your battery life if you have a rooted android device.
Get Greenify.
Put Instagram and Facebook in hibernation.
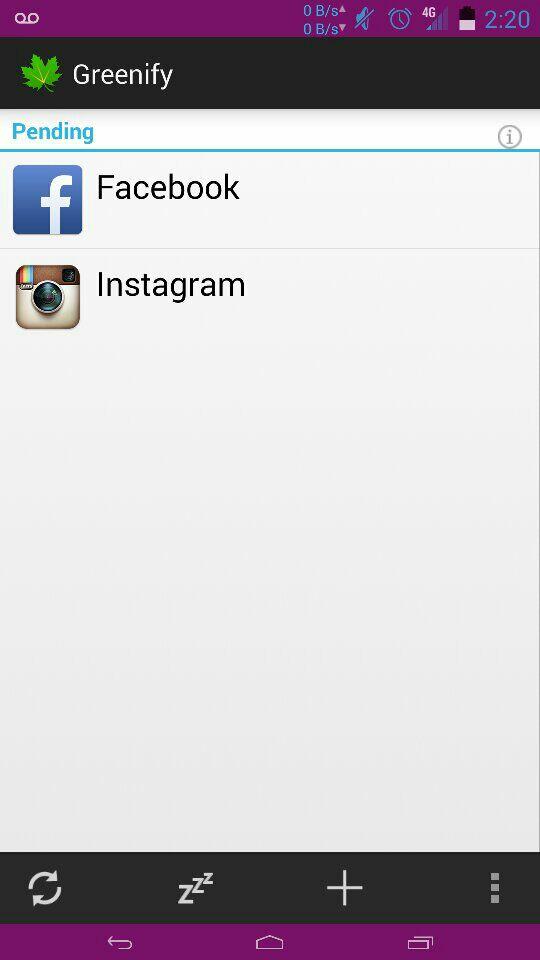
Now enjoy.

Here is a tip to extend your battery life if you have a rooted android device.
Get Greenify.
Put Instagram and Facebook in hibernation.
Now enjoy.

Beanstalk ROM with Chaos Kernel on the Nexus 5 from marcelliotnet on Vimeo.
Yesterday I picked up a Nexus 5 and while at work today, I rooted it, installed ClockworkMod recovery, and flashed it with the Beanstalk rom and Chaos kernel. So far i’m liking it, and i thought I would write a little something.
!!This will wipe your phone!!
First you will need to install the Nexus 5 drivers.
Then all you need to do to unlock and root your phone, is to put your phone in fastboot mode and run the CF-Auto-Root-hammerhead-hammerhead-nexus5 exploit. To put your phone in fastboot mode. You just need to power it off. Then while powered off hold down the down volume key and the power button at the same time. After in fastboot mode run the .bat file.
That’s it! your phone now is unlocked and rooted. Now if you want to install custom roms, you will need to flash it with ClockworkMod.
install the minimal_adb_fastboot to your computer. Then download the ClockworkMod recovery image. Place it in the C:\Program Files (x86)\Minimal ADB and Fastboot directory. Put your phone in fastboot mode again then run “fastboot flash recovery recovery.img” from the command prompt.
Once you have the recovery flashed you can start downloading custom roms and kernels. Here is a Chaos Kernel for you to try. Chaos-Kernel_v8.1 I would recommend going to xda for downloading custom roms.
![]()
![]()
Sipwise’s sip:providerCE v2.6 is a free VoIP solution that works…that’s about it, it doesn’t work great but it does work. It could have been my environment, but I don’t think the setup is anything special. First I installed sip:providerCE virtual image, on to my ESXi box. Log into the VMware console for the newly installed sipwise VM with the username/password of root/sipwise. I just let sipwise grab a DHCP lease, then run ‘ngcpcfg apply’ to generate the configuration files and reboot the server.
After that you should be able to log into the web interface at https://ipaddress:1433 with the username/password of administrator/administrator. You will then need to create a domain i.e. voip.yourdomain.com this can be an IP address as well. After that you will need to create a user, [email protected] and give that user a password. That’s pretty much it on the server side.
Now we need a client for Windows/OSX/Linux I used Jitsi, it’s kinda slow, but that’s what the guide I followed used so…but install the client and when it pops up to create an account click on Use online provisioning link at the bottom of the window. Check the Enable provisioning check box, select Manually specify a provisioning URI and put the following URL there, with only the IP address part changed to reflect your IP or domain name (make sure to leave the rest intact exactly as shown here):
https://IPofYourSipProviderServer/jitsi?user=${username}&pass=${password}&uuid=${uuid}
Close Jitsi and reopen it, and it should ask you for a username/password, after you log in you will need to go to Tools, Options, In the Accounts tab select the SIP account it created for you and click the Edit button at the bottom. In the Presence tab un-check the Use SIP Credentials check box and manually enter your username and password or close and reopen the app.
The Android client I used was CSipSimple which was very easy to setup, just create a basic account, give it a name, put in your username/password and server address.
If your going to be connecting to this from the internet you need to port forward https and UDP 5060/5061 to the SIPwise server.
Links below are to download the VM image and the blog post I followed.
SIPwise Blog
VMware Image


I used to use PDAnet before wireless tethering apps, but then Verizon had to start blocking tethering if you weren’t paying for it, so back to PDAnet I went. The newest version 3.50 has a wireless tether option, but I didn’t even try it because I read it didn’t work and only USB tethering would bypass the Verizon block page. PDAnet works with 2 pieces the app that you install on your phone, rather it be an Android, iPhone, or Blackberry. You then into install an app on your MAC or PC, no linux as of yet 🙁 this connects your computer to your phone’s internet connection.

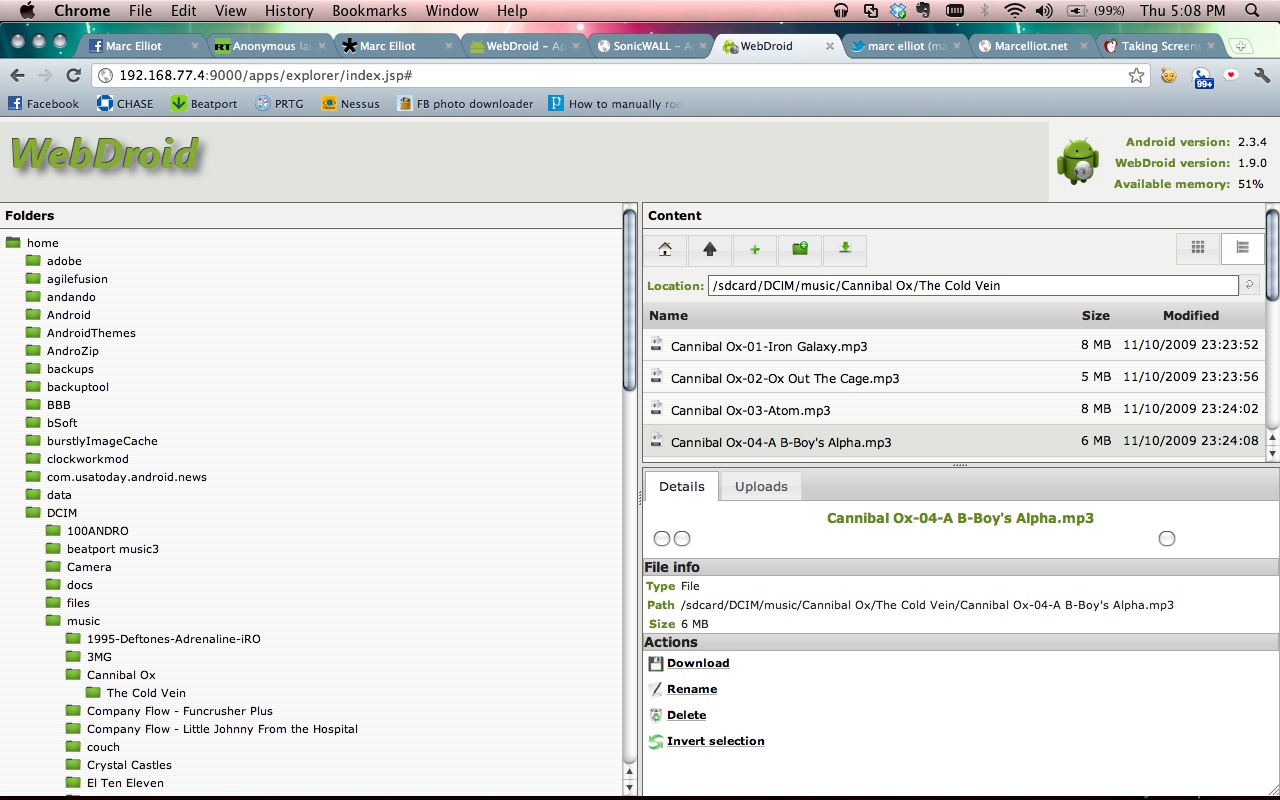
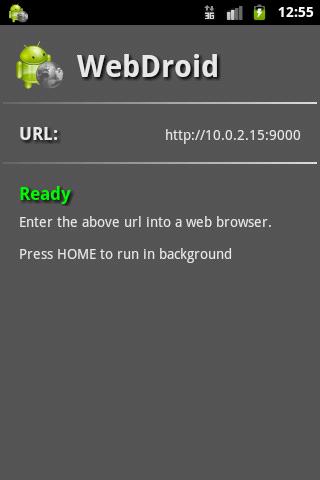
WebDroid is a web server on your Android phone. It allows you to access your phone’s file system from any web broswer over a wi-fi network. It have options for changing the server port and the ability to set a password. I have tried other apps like this in the past but I seem to lke this one the best.
Screen shots:

I found myself in a sticky situation and without a phone. Needing a phone quick I went to Cricket and got the cheapest Android phone I could get, which was the ZTE Score. After purchasing the phone I came to realize that you couldn’t download Google Voice from the market. 🙁 I don’t know why you couldn’t, and I didn’t really care to find out why, all I know is that i needed to find google voice somewhere. A quick search found it somewhere on a file sharing site. I downloaded this first one, and after installing it, the icon looked different and after launching it, it was asking me for my gmail account and password..woah, that’s not right. Soo I exited that will quick and searched again and founded a real version.
Now I wanted to root this guy. Seeing that the ZTE Score was not a popular phone and that I’m not very good with ADB or Android in general. The only way I could get it to work was with Zerg’s One Click Permanent Root tool. Which meant I had to use a Windows machine, and mine was all disconnected. After hooking all that back up, I installed the Drivers for the ZTE Score. The Phone must be in Debugging Mode, that is done from the home screen by pressing “menu”—>”Settings”—->Manage Applications—>Development and in there Debugging is an option. I plugged the phone in and ran the ZergRushTempRoot.bat file that was inside the zip file of Zerg’s One Click Permanent Root tool. I watched the console do it’s thing, it said it was successful, restarted, then it was rooted. Blam!

When I got my new job they gave me a HTC Incredible, So here I am carrying around 2 phones like I’m some drug dealer. ha. My idea was to port my old number to google voice and disconnect my old service, saving me 80 bucks a month 🙂
After that was done here I am stuck with this plain jane HTC Incredible. After doing some google searching I stumbled upon unrevoked.com. They make an app that installs on windows, OSX and linux which will install recovery and the rom of your choice, very painless. I installed some rom, don’t remember which one, but I didn’t really like it. After more searching for something different, I found Miui, A rom that kinda looks like the iPhone.
This rom is my favorite rom i have ever played with. It’s very good on battery life, it’s the most different looking rom i have ever seen, and it has transition effects when your flipping through your screens. It’s definitely a rom worth checking out. So if your thinking about rooting your HTC, go to unrevoked and download Miui, it’s very straight forward, not hard to do at all.
unrevoked.com
miuiandroid.com/roms/
5vpn lets you connect to a VPN in 5 clicks. It provides a shortcut to the built in VPN settings, in addition it saves your password so you only have to write it once.
transdroid is a torrent client manager for µTorrent, Transmission, rTorrent, Vuze, Deluge 1.2+ or BitTorrent 6. You can show and manage torrents, add them via URL, RSS feed or integrated search. A home screen widget is included.
andFTP is a full FTP client with SFTP and FTPS support.
XiiaLive allows streaming of multiple audio formats, aac+, m3u, pls, mp3, mp4, mp4a and mpeg. Also gives users the ability to easily surf the SHOUTcast directory.
mAnalytics allows you to view your basic Google Analytics stats on your phone. Supports multiple accounts, profiles, basic statistics and charts for visits and pageviews. For people who needs more stats info, a pro version is available which also includes a widget.

The main thing about the droid is that is uses xauth, DES for phase 2 of the IPsec negotiation, and L2TP has to be configured on the Sonicwall.
On the Droid the settings are pretty basic.
In the Droid go to settings > Wireless & Networks > VPN settings
Add VPN > add L2TP/IPsec PSK VPN
VPN name: office
VPN server: vpn.office.com or IP address
IPsec pre-shared key: enter the shared secret off the general tab of the WAN GroupVPN
Make sure the L2TP secret is disabled
The DNS search domains is optional .
Sonicwall configuration:
On the Sonicwall go to VPN > settings and edit the WAN GroupVPN. On the General Tab make up a pre-shared key.
On the proposal tab change the encryption for phase 2 to DES. You can leave the lifetime at defaults.
On the Advanced tab, enable XAuth and set the user group to Trusted users.
On the Client tab, allow connects to: all secured gateways, and enable set default route as this gateway.
Now under VPN > L2TP server, configure a L2TP IP pool that is on a different subnet that your LAN. L2TP has to route.
Go to Users > Local Users. Add a new user, goto the VPN access tab and give the user access to firewall subnets, L2TP pool and WAN Remote Access Networks.
Make sure you reconfigure a default outbound NAT policy to nat the L2TP clients out. This can be done just by changing the inbound interface to any. Some versions of firmware will make a L2TP outbound NAT policy for you.
If you run into any issue don’t forget to check the logs on the sonicwall.
Sorry i don’t have any pretty pictures for you to follow. If you have any issues please don’t contact me. I will not answer.