Load balancing DNS with Zevenet. After getting the server setup with its initial network configuration. First thing would be to setup a virtual NIC for the DNS traffic. Pretty straight forward, pick the parent interface, give it a name, and an available IP on the network.
vNIC Config
In this example I’m not using VLANs, so the VLAN tag shows up as the virtual interface name.
vNIC
To setup the load balancer, go to LSLB, then Farms. Select the virtual interface we just created, give it a port number of 53, protocol type is UDP, and NAT type is NAT. For the service setting, pick round robin, turn off persistence, set health checks to ping.
Load Balancer Config
Now click on add backend, enter in each of your DNS servers, giving them both a priority and weight of 1.
One caveat with load balancing DNS with Zevenet is that all the traffic will appear that it is coming from the load balancer, so any logs on the DNS servers will have the load balancer’s IP address. I try to alleviate the issue by setting the 2nd DNS in the client’s DNS settings to one of the DNS servers. So DHCP hands out the load balancer’s virtual interface IP as the first DNS server, and one of the DNS server’s IP addresses as the 2nd.
Cross-Forest Certificate Authority is not for the faint of heart. This post is not going walk you through on how to set all that up, but if you get to a point where you need to sync an object identifier (OID), like in this example Remote Desktop Authentication. This bit of powershell will help you find which oid is for remote desktop auth. You can then use PkiSync to get that over to the other domain.
It took a little searching to figure out how to setup two UPSs on one Nut server. The trick is leaving the port set to auto and using the serial number to differentiate between the two UPSs. Running lsusb -v will output the serial number of the usb devices you have attached. Now just add the second UPS to the ups.conf and set the serial number for both.
maxretry = 3
[apc-1500]
driver = usbhid-ups
port = auto
serial = 3B1XXXXXXX63
[apc2-1500]
driver = usbhid-ups
port = auto
serial = 3B2XXXXXXX28
I have had a Schlage zigbee lock for the front door for some time now, and I have always wanted to be able to set the user code for the door lock like you could do with zwave. Well today I just noticed that functionality has finally made it into Home Assistant. I wanted to auto-rotate the user code on my door lock, after doing some searching around I found someone that got it to work with a zwave lock, so I thought it couldn’t be that much different to get going with zigbee.
For my scenario, I’m using 4 digit user codes. The first part of the setup in configuring two “random” sensors in your configuration.yaml. This will be used to generate the 4 digit code.
Next we need a input_number helper, with the minimum value set to 1000 and the maximum set to 9999.
Now create a script that will set the input_number to the two numbers generated by the random sensors, notify you of the code in a text message, and then change the lock to the code generated.
service: input_number.set_value
data_template:
  entity_id: input_number.guest_code
  value: >-
    {{ states.sensor.first_set.state | int }}{{ states.sensor.second_set.state |
    int }}
service: notify.group
data_template:
  message: |-
    *New Lock Code Generated*
     The new code is: {{ states.input_number.guest_code.state | int }}
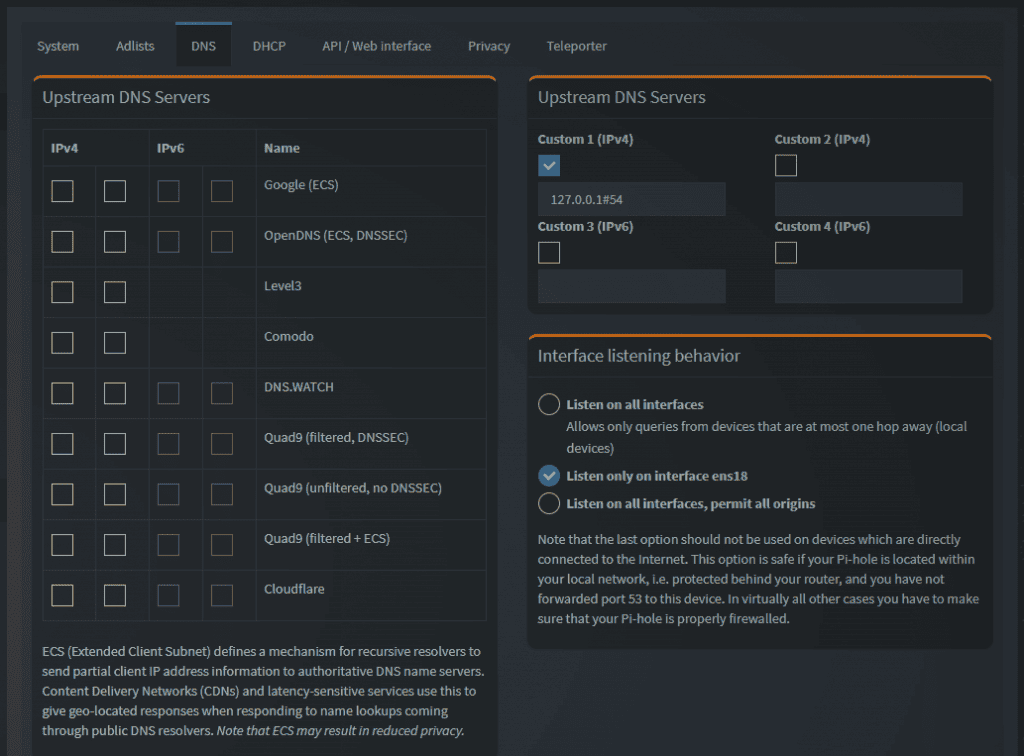
DNSCrypt is a network protocol that authenticates and encrypts Domain Name System (DNS) traffic between the user’s computer and recursive name servers. It was originally designed by Frank Denis and Yecheng Fu. Although multiple client and server implementations exist, the protocol was never proposed to the Internet Engineering Task Force (IETF) by the way of a Request for Comments (RFC). DNSCrypt wraps unmodified DNS traffic between a client and a DNS resolver in a cryptographic construction in order to detect forgery. Though it doesn’t provide end-to-end security, it protects the local network against man-in-the-middle attacks. It also mitigates UDP-based amplification attacks by requiring a question to be at least as large as the corresponding response. Thus, DNSCrypt helps to prevent DNS amplification attacks.
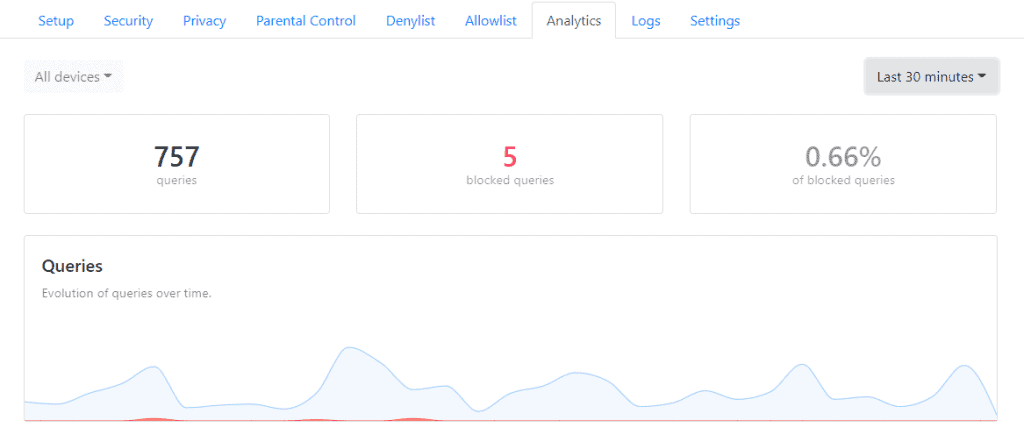
NextDNS is a fairly new DNS service that came into existence in May 2019. The founders of the service come from a background in managing Internet infrastructure. One of them in fact launched the popular video sharing site Dailymotion and currently works as Director of Engineering at Netflix. The founders of the service are stern supporters of net neutrality and privacy and launched NextDNS as a privacy-oriented and feature-rich alternative to the unencrypted DNS resolvers operated by ISPs.
Pi-hole is a Linux network-level advertisement and Internet tracker blocking application which acts as a DNS sinkhole and optionally a DHCP server, intended for use on a private network. It is designed for use on embedded devices with network capability, such as the Raspberry Pi, but it can be used on other machines running Linux, including cloud implementations. Pi-hole has the ability to block traditional website advertisements as well as advertisements in unconventional places, such as smart TVs and mobile operating system advertisements
This is going to assume you already have PiHole up and running on Ubuntu and signed up for a NextDNS account.
sudo apt install dnscrypt-proxy
After the install finishes it will register the service and try to start but fail since PiHole is already running on port 53.
Next edit the /lib/systemd/system/dnscrypt-proxy.socket file.
If you have been running Home Assistant for awhile on a SD card, you have probably had one fail on you by now. You can do things like exclude entities from the recorder and use a database like MySQL on a different server, but eventually the card will still die. I bought a 5 pack of SD cards just for this.. So USB Boot with Home Assistant.
When the new EEPROM came out letting you boot from USB on the Raspberry Pi 4 I thought it was time to build a new Home Assistant. Here are the steps to upgrade the EEPROM and enable USB boot. Once that is going, head over to the Home Assistant Github and download hassos_rpi4-64-5.5.img.gz the development 5 build 5. USB boot only works with the 64bit version.
Sometimes on Reddit I’ll see someone ask how people have their Home Assistant security camera setup. There are a lot of different options. I went with Amcrest cameras because those by themselves integrate with HA, I also setup a ZoneMinder server as well. I’m not going to go into my ZoneMinder or Amcrest camera config too much, besides just disabling the recording on the cameras, and turning on motion detection. I use ZoneMinder to handle the video recording, which i leave disabled unless we leave the house then Home Assistant turns on motion recording in ZoneMinder.
The little piece of code right here whitelists the directory the camera. Snapshot service is used to store the pictures the camera takes when someone sets off motion detection, then i have an automation that sends that picture to Telegram.
Here is the automation that triggers when the motion sensor on the Amcrest is set off. The piece that sends a photo to Telegram is in the script that runs. The automation also changes the color of a LED strip I have in my lab cabinet.
If you found this page, you were probably like me and spent a day trying to get this to work..Hopfully this should get you there. First you will need the new template_db_mysql_agent template from Zabbix. Download the xml and import the template into Zabbix. Now copy the UserParameters from the template_db_mysql.conf into notepad and edit it like the example below.
We are replacing -h”$1″ -P”$2″ with –defaults-extra-file=/etc/zabbix/.my.cnf
UserParameter=mysql.ping[*], mysqladmin --defaults-extra-file=/etc/zabbix/.my.cnf ping
UserParameter=mysql.get_status_variables[*], mysql --defaults-extra-file=/etc/zabbix/.my.cnf -sNX -e "show global status"
UserParameter=mysql.version[*], mysqladmin -s --defaults-extra-file=/etc/zabbix/.my.cnf version
UserParameter=mysql.db.discovery[*], mysql --defaults-extra-file=/etc/zabbix/.my.cnf -sN -e "show databases"
UserParameter=mysql.dbsize[*], mysql --defaults-extra-file=/etc/zabbix/.my.cnf -sN -e "SELECT COALESCE(SUM(DATA_LENGTH + INDEX_LENGTH),0) FROM INFORMATION_SCHEMA.TABLES WHERE TABLE_SCHEMA='$3'"
UserParameter=mysql.replication.discovery[*], mysql --defaults-extra-file=/etc/zabbix/.my.cnf -sNX -e "show slave status"
UserParameter=mysql.slave_status[*], mysql --defaults-extra-file=/etc/zabbix/.my.cnf -sNX -e "show slave status"
Now paste the edited code inside the zabbix_agentd.conf under UserParameters.
Next create a file in /etc/zabbix/ and name it .my.cnf
Edit the file with:
[client]
user=zbx_monitor
password=password
Now after a restart of the Zabbix agent MySQL should start reporting.
Updated: still using GrandWazoo’s FreeNAS ZFS over iSCSI plugin on TrueNAS 12.0-U4.1 and Proxmox 6.4-13. I’m pretty sure I read in the issues section on Github that it works with Proxmox 7, maybe someday soon I’ll give it a try. They have updated it so you won’t need to run the patch commands again after a kernel upgrade. If you’re using the plugin donate a little to GrandWazoo for doing god’s work.
I just setup a Proxmox cluster. I had to install the GrandWazoo plugin again on the second node, and i think some steps may have changed since i had to stumble through it.
The authenticity of host '192.168.1.10 (192.168.1.10)' can't be established.
RSA key fingerprint is 8c:f9:46:5e:40:65:b4:91:be:41:a0:25:ef:7f:80:5f.
Are you sure you want to continue connecting (yes/no)? yes
Now after a restart of the services or a reboot, you should have FreeNAS to pick from in the drop down.
Since I already had this setup on my first node, when i added the new node to the cluster it carried over the ZFS over iSCSI settings, then i could just magically migrate VMs to the new node.
Thank you to the GrandWazoo for making this plugin!
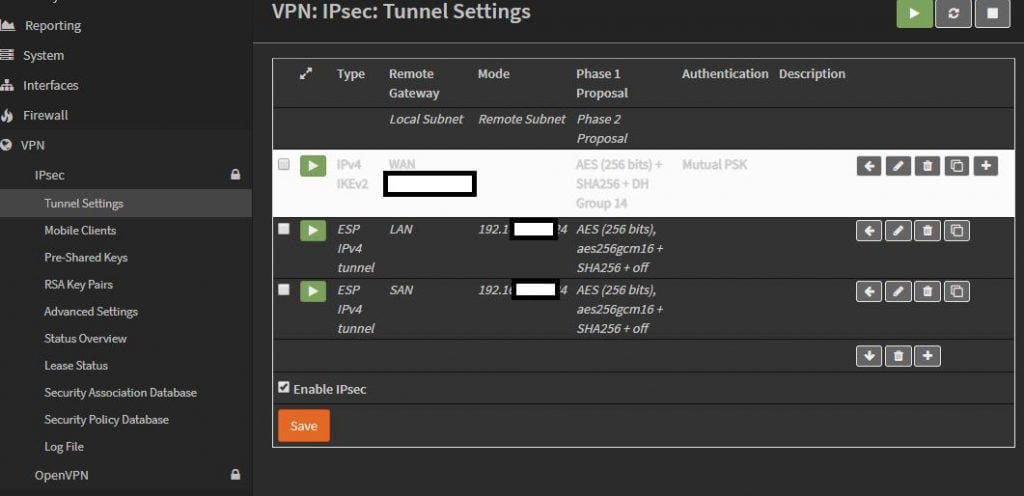
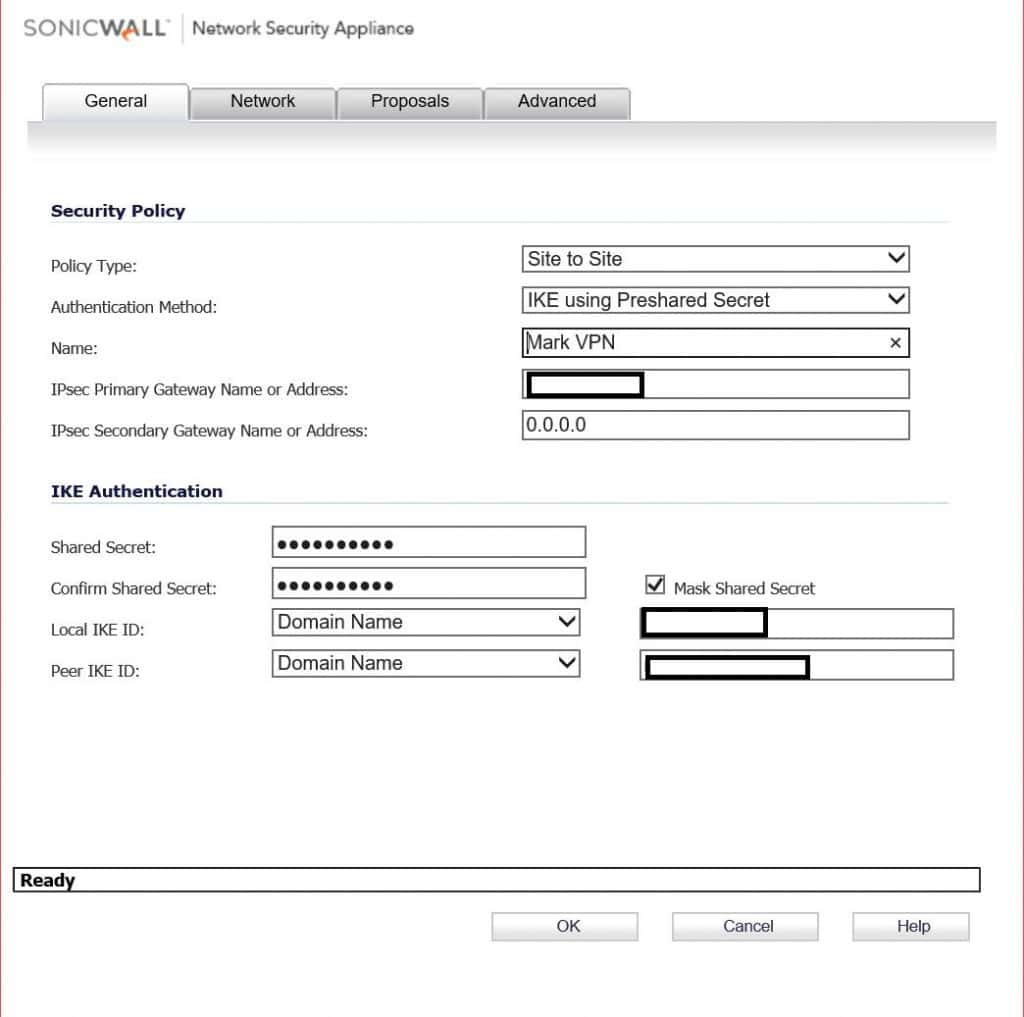
The scenario is two networks on the OPNsense side, one on the Sonicwall’s. Changing the defaults for a little bit of security. Both sides also have static IPs but this setup also worked when the OPNsense’s was dynamic.
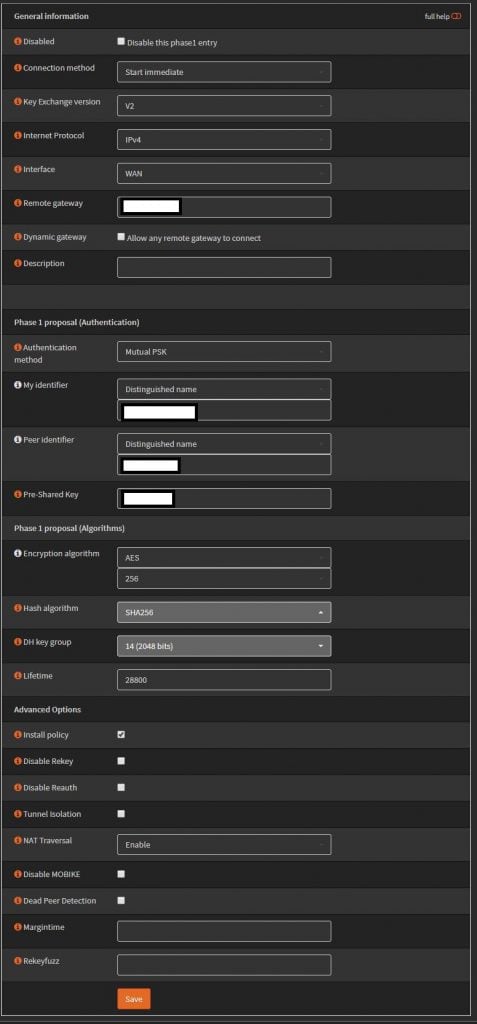
Using IKEv2 with preshared key. AES256, SHA256, and DH Group 14. For the identifiers use distinguished name, and enter in your domain names, these actually don’t have to resolve so you can make them up. Set life time to 28800.
Phase 2. The remote network is going to be the Sonicwall’s “LAN” 192.168.x.0. Change the lifetime to 3600, uncheck unused ciphers. I have two networks on this side, so I just created another phase 2 policy for the 2nd network.
On the Sonicwall, enter in the OPNsense’s public IP, and the preshared key. For IKE IDs, these will be the My and Peer identifiers from phase 1 of the OPNsense config.
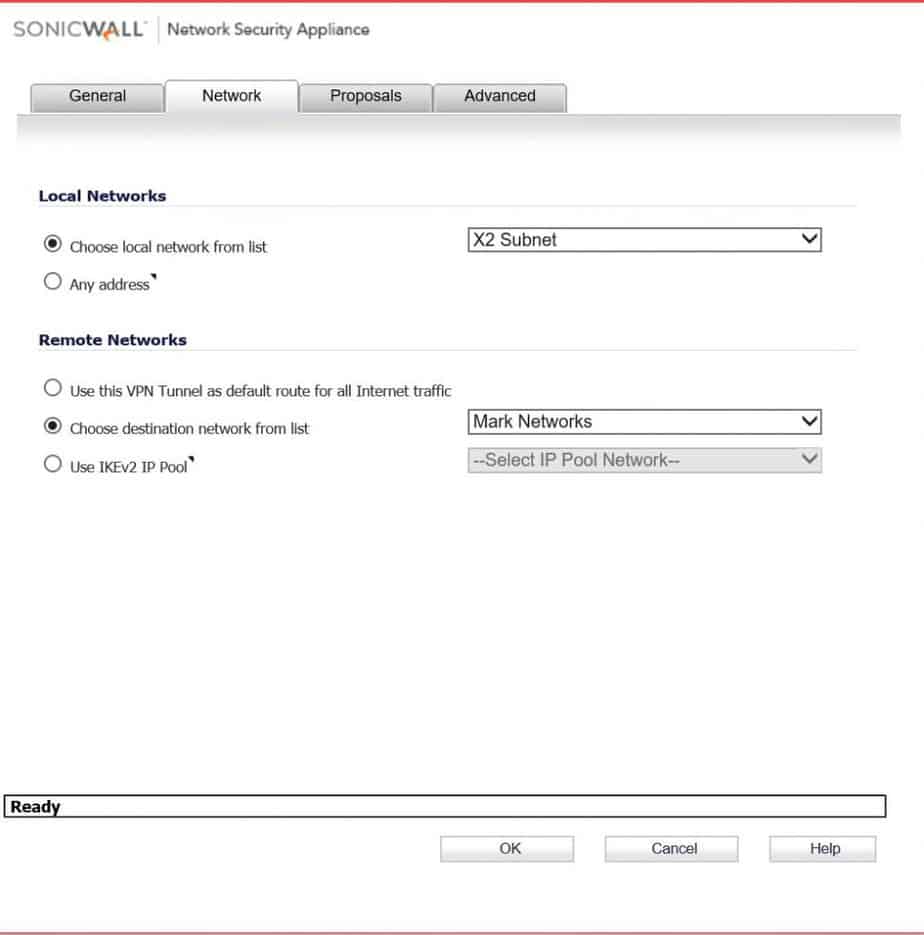
Pick the local network on the sonicwall side. For remote network pick the address object you should have created for this. ( Sorry, I don’t go over creating one of those). In this scenario there are two networks on the OPNsense side, so I create two VPN Network address objects, and put them in a group.
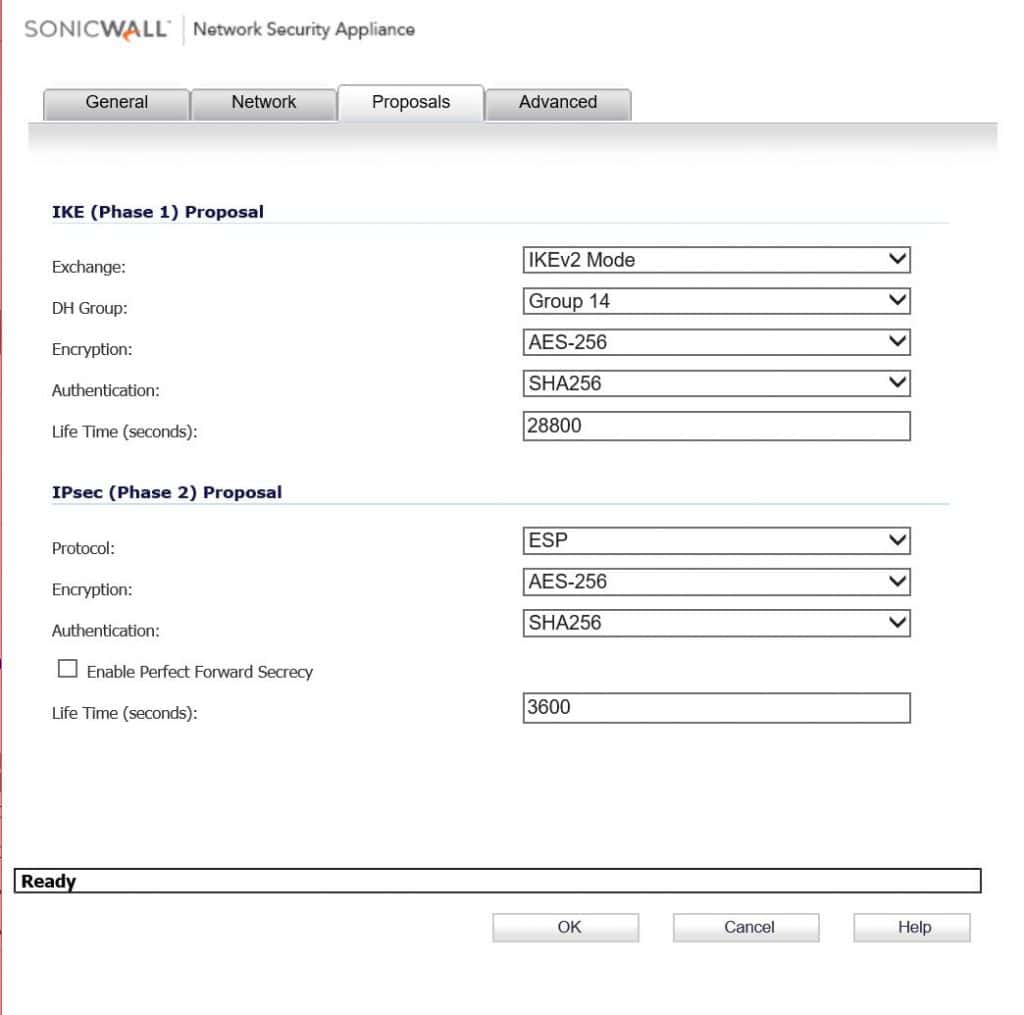
Here again using IKEv2 AES256, SHA256, and DH Group 14. Change Phase 2 life time to 3600.
Enable keep alive and do not send trigger packet. Click OK and if everything goes well you should see some green lights. This also doesn’t go over what firewall rules you would need to create to pass traffic, you could do any any allow all, but you might no trust the other side.
It took me a bit to get an alarm clock going in Home Assistant. I also wanted to try waking up to the light gradually turning on instead of sound. The first thing you will need two input booleans in the configuration.yaml, one for time, and one for turning the alarm on and off.
input_datetime:
  alarm_clock:
    name: Alarm Clock
    has_time: true

input_boolean:
  alarm_clock_on:
    name: Alarm Clock On
    initial: on
    icon: mdi:alarm-check
The automation triggers when whatever the time that it is set to in the input_datetime boolean hits. I also have two conditions for it to only work when the input_boolean is on, and only if either one of us is home. The two scripts it runs are for the light, and for casting home assistant to a google hub that sits next to the bed.
Here is what the script for turning on the light looks like in the gui. It starts off pretty dim and red, then tries to mimic a sunrise in 5 minutes. I would say i prefer waking up this way instead of to a playlist, maybe I’ll have a playlist kick on after the light wakes us up.
If you have telegram setup, you can also have it do telegram things like telling you if the alarm is off, or have it ask you if you would like to turn on the home assistant alarm clock Sunday night and off on Fridays after the week is over.
- id: '1573417282799'
  alias: Alarm Clock Status Change
  description: ''
  trigger:
  - entity_id: input_boolean.alarm_clock_on
    platform: state
  condition: []
  action:
    service: notify.group
    data_template:
      message: Alarm Clock is {{trigger.to_state.state}}
Presence detection is one of the hardest things to get setup reliably in home automation. NMAP is probably the easiest way to get it done, but it is also unreliable. Having automations disable themselves is a good workaround. Here is an example of how i have it setup.
The Away Automation triggers when my phone is off the network for 30mins. This automation when triggered turns on an automation that triggers when I come home.
The Home automation when triggered turns its self off.
I had my away automations trigger at 15mins, but then i would sometimes get false positives, so i would add 5mins, but i would still get one firing off when we are still home. So here i am at 30mins, and i haven’t got a false positive in probably over 2 months.
UPDATE: started using Life360 and this guy’s bluetooth script. Things are working much better. I had terrible luck with Owntracks so i never even brought it into any of my automations. Will update after more testing.
Being able to have google cast Home Assistant is pretty handy but kinda hard to do. For this I have Home Assistant Cloud and IFTTT integration setup. Create a Google Assistant trigger for what you want to say. You can grab your IFTTT webhooks URL from the bottom of the Home Assistant Cloud configuration page in Home Assistant. The body will need the entity name of your Home Hub and the view in Home Assistant.
Now in Home Assistant create a new automation. Just create the event trigger shown below and leave the action blank. Open up the automations.yaml, the one you just made should be at the bottom of the file. Paste in the service template at the bottom of this post. make sure the spacing right, run a config check to make sure it checks out.
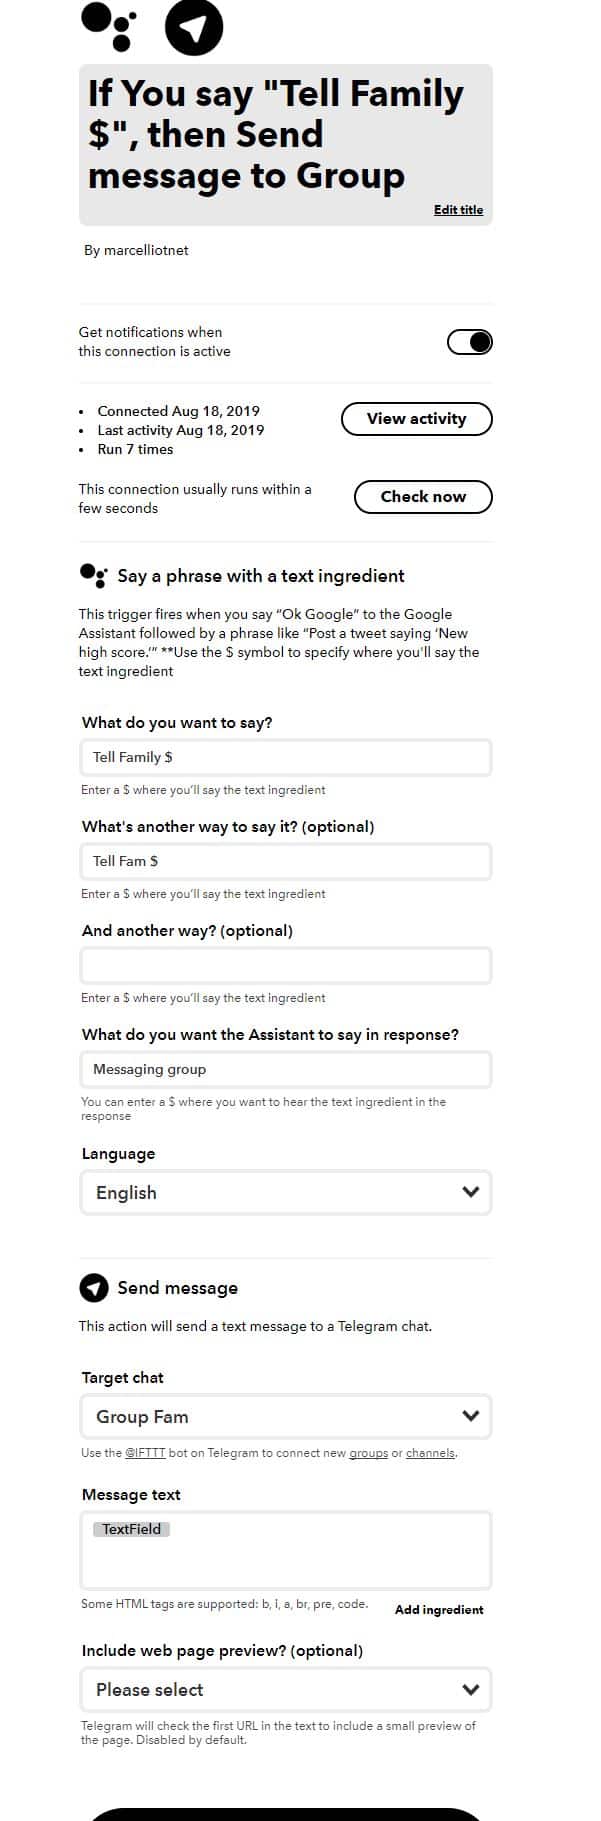
Found this useful if you use Telegram. Create an IFTTT applet to text a Telegram group whenever you say Ok, Google tell group blah blah blah. I have created the IFTTT Applet and left it open to configure. I have mine setup to have Google Assistant trigger whenever I say “Tell Family” or “Tell Fam” the $ represents what you’re going to say in your text.
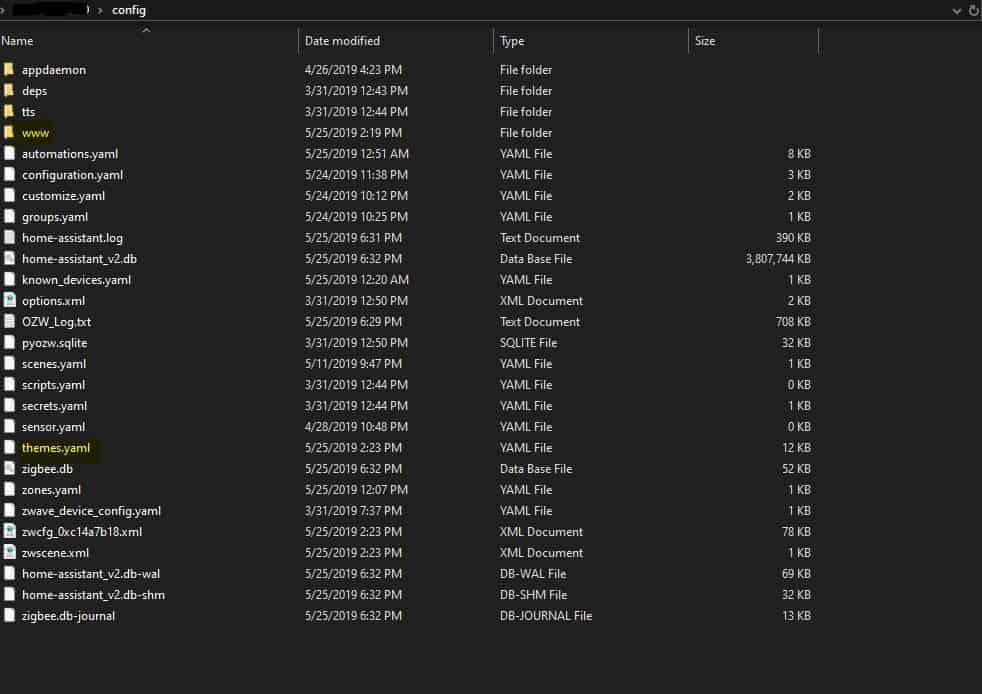
download this wallpaper and place it in the www folder. Now in Hassio, in the top right, click on Configure UI, then Raw Editor, add the following at the top:
background: var(--background-image)
Raw Editor
Restart Home Assistant and it should be pretty.
BONUS: The Card Mod allows you to add css styles to any lovelace card. Install it manually or with HACS. https://github.com/thomasloven/lovelace-card-mod Once installed add the following code to a card.
Copy the question and edit it for the patch list you want to report on. In my case 14. This will give you server names, if they’re missing any patches, and the last time it rebooted.
Get Computer Name and Operating System and Patch – Patch List Compliance[1,””,30,30,30,30,30,30,””,””] matches “^14|.*$” and Patch – Scan Age and Last Reboot from all machines with ( Windows OS Type contains server and Is Windows equals true )
The Brave browser blocks the ads and trackers that slow you down, chew up your bandwidth, and invade your privacy. Brave even lets you contribute to your favorite creators automatically.
There were error(s) loading the rules: /tmp/rules.debug:19: cannot define table bogonsv6: Cannot allocate memory – The line in question reads [19]: table persist file “/etc/bogonsv6”
over over again, then it stops passing traffic..
thank you internets.
Solution is to increase Max firewall table entries to 500,000 from the default 200,000 and then reload filter.
System > Advanced > Firewall & NAT > Firewall Maximum Table Entries > 500000 Status > Filter Reload > Reload Filter